vue3组件通信&插槽
组件通信
Vue3组件通信和Vue2的区别:
- 移出事件总线,使用
mitt代替。
vuex换成了pinia。- 把
.sync优化到了v-model里面了。 - 把
$listeners所有的东西,合并到$attrs中了。 $children被砍掉了。
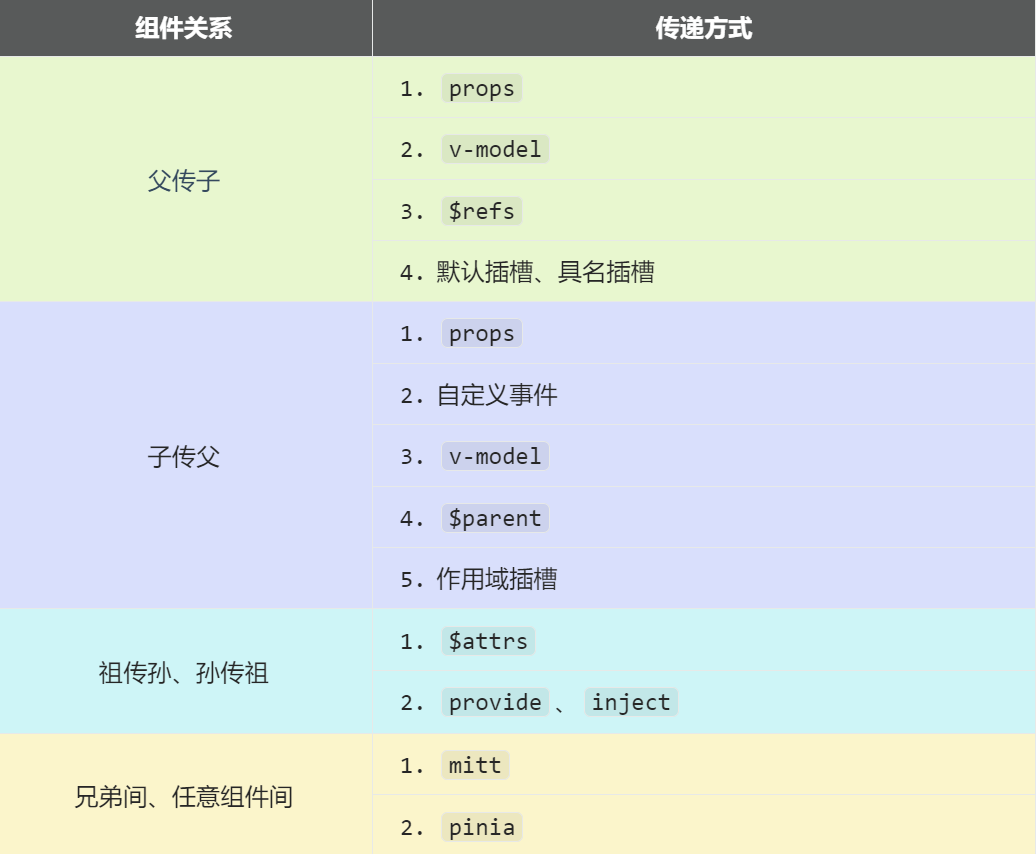
9个组件通信方式用处 及 选择:
| 通信方式 | 通信类型、关系 | 特点 | 使用建议 | |
|---|---|---|---|---|
| 1 | props | 简单父<=>子通信 | 传递数据或事件简单直接 | 更为直观和易于理解。推荐 |
| 2 | 自定义事件 | 子->父 | 事件对象$event: 是调用emit时所提供的数据,可以是任意类型!使用v-on监听自定义事件 | 事件名推荐使用肉串命名(kebab-case形式)。推荐 |
| 3 | mitt | 任意组件通信 | 接收数据的组件提前绑好事件,提供数据的组件在合适的时候触发事件 | 和Event Bus相似,事件管理分散,难以跟踪事件流,难以维护 |
| 4 | v-model | 父<=>子通信 | 本质:props传参+自定义事件,简化双向数据同步 | UI组件库底层使用 |
| 5 | $attrs | 祖<=>孙(子为中介) | 需要子组件作为中介,会自动排除子组件props中声明过的属性 | 影响组件封装性、属性重复定义以及影响渲染性能等。谨慎使用,不推荐 |
| 6 | $refs、$parent | $refs:父→子、、 $parent:子→父 | 获取组件实例,可以操作暴露出去的数据 | 尽量少用,破坏封装 |
| 7 | provide、inject | 祖<=>孙直接通信 | 对子组件0打扰 | 适合祖先到后代的数据传递,但谨慎防过度使用,不便于维护 |
| 8 | pinia | 任意组件通信 | 集中式状态(数据)管理 | 比vuex更优化,特别适合复杂状态共享。推荐使用 |
| 9 | 插槽slot | 本质 父<=>子通信 | 对结构复用,支持自定义结构,提高组件的可重用性和灵活性 | UI组件库作用域插槽用的非常多,适合 父 控制 子 部分布局或内容的场景 |
常见搭配形式:
props
props是单向数据流,从父组件传递给子组件,而不能从子组件传递给父组件。
vue3与vue2的props不同的点在于:vue3可以传函数
所以,vue2中,自定义属性props只能父传子,而子传父就需要借助自定义函数
但是,vue3中,自定义事件props不仅能够父传子,还能够子传父(通过 调用父的函数传参 的形式)
概述:props是使用频率最高的一种通信方式,常用与 :父 ↔ 子。
- 若 父传子:属性值是非函数。 ———— 父给子,直接传值
- 若 子传父:属性值是函数。 ———— 子给父,传参形式调用父的函数(父要先给子传一个函数)
父组件:
1 | <template> |
子组件
1 | <template> |
自定义事件
- 概述:自定义事件常用于:子 => 父。
- 注意区分好:原生事件、自定义事件。
- 原生事件:
- 事件名是特定的(
click、mosueenter等等) - 事件对象
$event: 是包含事件相关信息的对象(pageX、pageY、target、keyCode)
- 事件名是特定的(
- 自定义事件:
- 事件名是任意名称(官方推荐使用 kebab-case 形式(也叫肉串命名)来编写监听器/自定义事件)(vue2时候就已经有这个规矩了)
- 事件对象
$event: 是调用emit时所提供的数据,可以是任意类型!!!
示例:
1
2
3
4
5<!--在父组件中,给子组件绑定自定义事件:-->
<Child @send-toy="toy = $event"/>
<!--注意区分原生事件与自定义事件中的$event-->
<button @click="toy = $event">测试</button>1
2//子组件中,触发事件:
this.$emit('send-toy', 具体数据)
mitt
概述:与消息订阅与发布(pubsub)、vue2的$bus功能类似,可以实现任意组件间通信。
mitt体积非常小,200byte,用不用项目体积几乎没有变化
因为vue3中没有全局事件总线,所以用这种插件替代
他们都是一个套路:
接收数据的:提前绑好事件(提前订阅消息)
提供数据的:在合适的时候触发事件(发布消息)
尽量不要使用全局事件总线vue2 - $bus,vue3 - mitt,会变得难以维护,provide/inject也是一样尽量不要用
语法:
- all:拿到所有绑定的事件
- clean:
emitter.all.clear(),清空,清空所有绑定的事件
- clean:
- emit:触发某一个事件
- off:解绑某一个事件
- on:绑定某一个事件
安装mitt
1 | npm i mitt |
新建文件:src\utils\emitter.ts
1 | // 引入mitt |
在main.ts引入emitter
全局引入emitter?
1 | import emitter from '@/utils/emitter' |
1 | // 引入mitt |
接收数据的组件中:绑定事件、同时在销毁前解绑事件:
1 | import emitter from "@/utils/emitter"; |
【第三步:提供数据的组件,在合适的时候触发事件
1 | <button @click="emitter.emit('send-toy',toy)">给弟弟玩具</button> |
注意这个重要的内置关系,总线依赖着这个内置关系
v-model
和vue2相比有一些变化
UI组件库底层,大量使用v-model进行通信
概述:实现 父↔子 之间相互通信。
前序知识 ——
v-model的本质(v-model用在HTML标签上 – 表单元素上)
v-model的底层,是一个动态的value值,:value,配合上input事件1
2
3
4
5
6
7
8
9
10
11<!-- 使用v-model指令 -->
<input type="text" v-model="userName">
<!-- v-model的本质是下面这行代码 -->
<input
type="text"
:value="userName"
@input="userName =(<HTMLInputElement>$event.target).value"
>
<!-- ts会爆红,因为$event可能为null —— 通过js new Event()出来的
加上<>是断言,告诉它就是个HTML输入类型的元素 -->组件标签上的
v-model的本质::moldeValue+update:modelValue事件。也就是绑定了一个props传参 + 一个自定义事件(接收每次修改的值)
1
2
3
4
5
6
7
8
9<!-- 组件标签上使用v-model指令 -->
<AtguiguInput v-model="userName"/>
<!-- 组件标签上v-model的本质 -->
<!-- vue2用的是:value、@input="",Vue3是:modelValue、@update:modelValue // 它就是一个自定义事件,只是它命名里面带了冒号: -->
<AtguiguInput :modelValue="userName" @update:model-value="userName = $event"/>
<!-- userName = $event的作用,和(val)=>username = val是一样的 -->
<!-- 对于原生事件,$event就是事件对象 -->
<!-- 对于自定义事件,$event接收的就是触发事件时,传递过来的数据 -->AtguiguInput组件中:这些,就是UI组件库底层做的
1
2
3
4
5
6
7
8
9
10
11
12
13
14
15
16
17
18<template>
<div class="box">
<!--将接收的value值赋给input元素的value属性,目的是:为了呈现数据 -->
<!--给input元素绑定原生input事件,触发input事件时,进而触发update:model-value事件-->
<input
type="text"
:value="modelValue"
@input="emit('update:model-value',$event.target.value)"
>
</div>
</template>
<script setup lang="ts" name="AtguiguInput">
// 接收props
defineProps(['modelValue'])
// 声明事件
const emit = defineEmits(['update:model-value'])
</script>也可以更换
value,例如改成abc如果直接写
v-model="xxx", 底层默认就是:modelValue+update:modelValue
当然也可以改这个名字,比如改成abc,就需要我们这样写:v-model:abc="xxx",
在底层,就变成了:abc="xxx"、@update:abc="xxx = $event"
在组件中,封装的就不再是拿modelValue接收,而是拿abc和update:abc:
defineProps(['abc'])、const emit = defineEmits(['update:abc'])1
2
3
4
5<!-- 也可以更换value,例如改成abc-->
<AtguiguInput v-model:abc="userName"/>
<!-- 上面代码的本质如下 -->
<AtguiguInput :abc="userName" @update:abc="userName = $event"/>AtguiguInput组件中:1
2
3
4
5
6
7
8
9
10
11
12
13
14
15
16<template>
<div class="box">
<input
type="text"
:value="abc"
@input="emit('update:abc',$event.target.value)"
>
</div>
</template>
<script setup lang="ts" name="AtguiguInput">
// 接收props
defineProps(['abc'])
// 声明事件
const emit = defineEmits(['update:abc'])
</script>如果
value可以更换,那么就可以在组件标签上多次使用v-model1
<AtguiguInput v-model:abc="userName" v-model:xyz="password"/>
$attrs
概述:
$attrs用于实现当前组件的父组件,向当前组件的子组件通信(祖→孙)。具体说明:
$attrs是一个对象,包含所有父组件传入的标签属性。注意:
$attrs会自动排除props中声明过的属性(可以认为声明过的props被子组件自己“消费”了)
父组件:
1 | <template> |
子组件:
1 | <template> |
孙组件:
1 | <template> |
$refs、$parent
概述:
$refs用于 :父→子。$parent用于:子→父。
原理如下:
属性 说明 $refs值为对象,包含所有被 ref属性标识的DOM元素或组件实例。$parent值为对象,当前组件的父组件实例对象。
$refs使用 – 父->子$refs本身就是一个响应式的对象,里面再去读取ref( 组件实例c1 c2(响应式对象)身上的响应式对象toy、computer ),就不需要.value
响应式对象$refs,里面包含 每一个组件实例(也是响应式对象),每一个组件实例身上包含 暴露给父组件的响应式对象1
2
3
4
5
6
7
8
9
10
11
12
13
14
15
16
17
18
19
20
21
22
23
24
25
26
27
28
29
30
31<Child1 ref="c1"/>
<Child2 ref="c2"/>
<button @click="changeToy">修改Child1的玩具</button>
<button @click="changeComputer">修改Child2的电脑</button>
<button @click="getAllChild($refs)">让所有孩子的书变多</button>
import Child1 from './Child1.vue'
import Child2 from './Child2.vue'
import { ref,reactive } from "vue";
let c1 = ref()
let c2 = ref()
function changeToy(){
c1.value.toy = '小猪佩奇'
}
function changeComputer(){
c2.value.computer = '华为'
}
// 要告诉程序,ref是对象,对象又是字符串的键,值不知道是什么 -- 否则飘红(ts)
function getAllChild(refs:{[key:string]:any}){ // 这里也可以直接any
console.log(refs)
for (let key in refs){
refs[key].book += 3
}
}
// // 子组件需要把数据交给外部
// child1把数据交给外部
defineExpose({toy,book})
// child2把数据交给外部
defineExpose({computer,book})$parent使用 – 子->父$parent也是一个响应式的对象,里面再去读取ref也不需要.value1
2
3
4
5
6
7
8
9<button @click="minusHouse($parent)">干掉父亲的一套房产</button>
// 方法
function minusHouse(parent:any){
parent.house -= 1
}
// 父组件同样将数据需要暴露出去
defineExpose({house})
provide、inject
概述:实现祖孙组件直接通信
具体使用:
- 在祖先组件中通过
provide配置向后代组件提供数据 - 在后代组件中通过
inject配置来声明接收数据
- 在祖先组件中通过
具体编码:
【第一步】父组件中,使用
provide提供数据
注意:不要去.value,因为你一旦.value,就是在取值了,这样就是把具体的值传进去,而不是传进去响应式的数据1
2
3
4
5
6
7
8
9
10
11
12
13
14
15
16
17
18
19
20
21
22
23
24
25
26
27
28<template>
<div class="father">
<h3>父组件</h3>
<h4>资产:{{ money }}</h4>
<h4>汽车:{{ car }}</h4>
<button @click="money += 1">资产+1</button>
<button @click="car.price += 1">汽车价格+1</button>
<Child/>
</div>
</template>
<script setup lang="ts" name="Father">
import Child from './Child.vue'
import { ref,reactive,provide } from "vue";
// 数据
let money = ref(100)
let car = reactive({
brand:'奔驰',
price:100
})
// 用于更新money的方法
function updateMoney(value:number){
money.value += value
}
// 提供数据
provide('moneyContext',{money,updateMoney})
provide('car',car)
</script>注意:子组件中不用编写任何东西,是不受到任何打扰的
【第二步】孙组件中使用
inject配置项接受数据。1
2
3
4
5
6
7
8
9
10
11
12
13
14
15
16
17
18
19
20
21<template>
<div class="grand-child">
<h3>我是孙组件</h3>
<h4>资产:{{ money }}</h4>
<h4>汽车:{{ car }}</h4>
<button @click="updateMoney(6)">点我</button>
</div>
</template>
<script setup lang="ts" name="GrandChild">
import { inject } from 'vue';
// 注入数据
let {money,updateMoney} = inject('moneyContext',{money:0,updateMoney:(x:number)=>{}})
let car = inject('car')
// 如果模版中写的是
<h4>汽车 品牌{{ car.brand }} 金额 {{ car.price }}</h4>
// 这里的两个car.xxx就会飘红,但是不会报错,这里是因为它没有推断好
// 如果想要不爆红,可以通过默认值的形式,去帮助它推断:
let car = inject('car',{brand:'未知',price:0})
// 如果没有传,那就是默认值,传了就不是
</script>
pinia
参考之前pinia部分的讲解
slot
默认插槽
1 | 父组件中: |
具名插槽
1 | 父组件中: |
作用域插槽
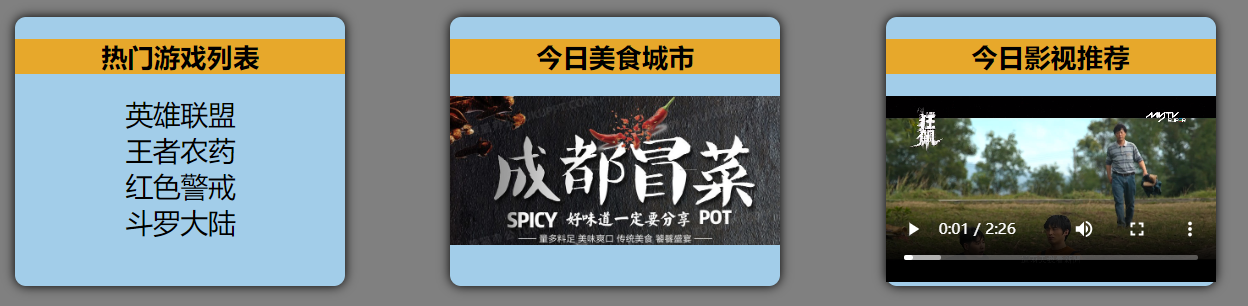
UI组件库用作用域插槽用的非常多,如:对话框、表格
也就是,把数据传给组件的使用者。
理解:数据在组件的自身,但根据数据生成的结构需要组件的使用者来决定。(新闻数据在
News组件中,但使用数据所遍历出来的结构由App组件决定)具体编码:
1
2
3
4
5
6
7
8
9
10
11
12
13
14
15
16
17
18
19
20
21
22
23
24
25
26父组件中:
<Game v-slot="params">
<!-- <Game v-slot:default="params"> -->
<!-- <Game #default="params"> -->
<ul>
<li v-for="g in params.games" :key="g.id">{{ g.name }}</li>
</ul>
</Game>
子组件中:
<template>
<div class="category">
<h2>今日游戏榜单</h2>
<slot :games="games" a="哈哈"></slot>
</div>
</template>
<script setup lang="ts" name="Category">
import {reactive} from 'vue'
let games = reactive([
{id:'asgdytsa01',name:'英雄联盟'},
{id:'asgdytsa02',name:'王者荣耀'},
{id:'asgdytsa03',name:'红色警戒'},
{id:'asgdytsa04',name:'斗罗大陆'}
])
</script>